Why I decided to create a Virtualized Tech Machine?
It allows me to satisfy a goal in dealing with the unknown element of customer drives and machines. I am now able to scan and manipulate a customer’s hard drive in an isolated/sterile environment. As a benefit I am also able to utilize greater processing power when scanning drives. It also lets me get my fix of playing with VMs and really fully using the resources of a computer.
Hardware:
Asus P6T X58 LGA1366
Intel Core i7-920 (2.4ghz 4C/8T)
Kingston 6x4GB DDR3
Nvidia GTX580
iStarUSA D-400L 4U Server Chassis
LianLi 750W PSU
USB 3.0 Controller Card
3x Dual Drive USB 3.0 Dock
1x Single Drive USB 3.0 Dock
Storage:
OCZ RevoDrive X2 240GB {Windows 10 – HostOS}
Seagate Constellation 1TB {NAS VHD Storage}
WD Scorpio Black 500GB {VM Testing}
WD Scorpio Black 750GB {Persistent VHD Storage}
Software Setup:
For this setup I chose Windows 10 and Hyper-V. I want to be able to interact with the VM Management environment directly on the same machine I will be connecting disks to. Additionally it allows me Direct Disk Access to the drives.
First you want to install your HostOS on the base of the system. At this point I generally disconnect all other non-involved drives. In this case I installed Windows 10 Enterprise. Note: It is required you install Windows 10 Pro or higher to use Hyper-V along with having a VT-D enabled processor. Once Windows 10 is installed as normal with all updates and drivers you are ready to install Hyper-V. Go to Add/Programs and Features then add Hyper-V ensuring that Hyper-V Manager is installed as well. Windows will require a reboot and then you’ll be ready to start managing the server.
VM Tips:
A crucial detail at this point about the HostOS, it is a full OS. You can game on it and do full browsing if you wish but bear in mind this is the foundation of your other systems running on top. Keep it simple and clean and then no problems will arise.
Now that you have rebooted you can start managing your VMs and layering your OSs on the machine.
VM Tips:
A few things to bear in mind while configuring VMs. How do you intend on using them? Do they need to be Generation 1 for CSM booting or Generation 2 for UEFI booting? How much system RAM am I using? Which hard drive am I thrashing while updating an OS and what else is trying to use that drive.
I use the USB Docks for interacting with drives. This allows you to power the drives of independently of the whole system. It will allow you to connect the drives directly to each VM if you wish. Note you have to bring a disk offline to allow Hyper-V Direct Disk access. You can run multiple VMs at once connected to different drives in different docks. If you configure Windows VMs to direct disk access drives on the SCSI controller you can hot plug drives from the VM without rebooting it.
VM Tips:
This diskpart command will change Windows to not bring any newly connected disks online. Essential to keeping the HostOS clean. All drive interaction should take place with the VMs not the HostOS. (Unintended side effect: USB Flash Drives cannot be brought online manually on my HostOS. Hard drives can be brought online manually just fine.)
DISKPART.EXE
DISKPART> san
SAN Policy: ?????
DISKPART> san policy=OfflineAll
DISKPART> san
SAN Policy: Offline All
Resource management is an important aspect to VM creation. You have to be aware of how much processing power and RAM to give each VM. I find most of my VMs can get by on 2-cores each and I generally give them 2GB of RAM. Recent versions of Windows have featured Dynamic Memory Allocation when used with Hyper-V. This allows each VM OS to report how much RAM it really needs and the HostOS can adjust accordingly. For an AV scanning VM I might bump up to 4-Cores. I witnessed 19GB of RAM usage on this machine during a work day this week.
Persistent VM creation can be a long but rewarding process but the beauty of VM work is that you can shut down the VM copy the VHD. Then make a change if you are unhappy simply roll back. Once you create the TechOS with all of your tools integrated create a backup. Depending on your Windows License you may be able to duplicate out to other machines if you wish.
For Compatibility Configurations that will work with VMWare and Linux/MacOS Environments
Choose Gen 1 CSM then Create and use a VHD formatted file.
There is a VHDX to VHD Conversion Tool if you need it.
Organization:
VMs can become a mess if you don’t keep them organized here is how I’ve got mine laid out.
Volume Labels
C: Windows 10 (RevoDrive)
D: VHD TEST Store 500GB
E: VHD DATA Store 1TB
F: VHD OS Store 750GB
Locations
Bootable ISOs – I keep on C in a folder in the root “!Images”
Persistent VMs – I keep on F in a folder “VHD Storage”
Test VMs – I keep on D in a folder “!VHD Testing”
NAS Storage – I keep on E in a folder “VHD Storage”
Hyper-V Manager Screen Shot:
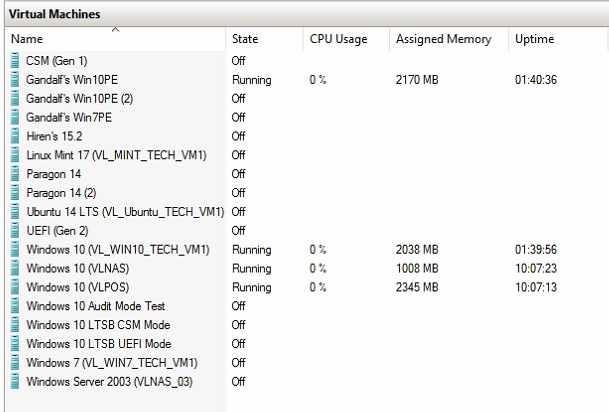
Working Tools 2/23/2016:
Gandalf’s Windows 10 PE – Live ISO Based
Gandalf’s Windows 7 PE – Live ISO Based
Hiren’s 15.2 – Live ISO Based
Paragon 14 – Live ISO Based
Windows 10 TechOS VM – Persistant
Windows 10 NAS VM – Persistant
Work In-Progress…
Linux Mint 17
Ubuntu 14 LTS
Windows 7 TechOS
Real World Usage:
Example A)
I frequently find myself cloning disk to disk using on a Paragon VM on one dock, a second dock doing the same thing with another Paragon VM, and then a third dock with a single drive connected to another my Win 10 Tech VM doing a virus scan.
Example B)
Customer brings in modern Win 8-10 based UEFI system. Machine will not power on. I can take the customer HDD connect to my UEFI Gen 2 VM (A blank VM just configured with UEFI and Secure Boot) then boot the customers hard drive up and interact with their OS.
Example C)
New build has been commissioned while bench testing the RAM and CPU. An SSD or HDD can be connected to a UEFI Gen 2 VM with a Windows 10 ISO connected. Then load Windows enter OEM audit mode and install all Windows updates and copy over any necessary drivers and software for the end hardware.
Limitations:
No direct drive information, all SMART data from drives is suppressed. So initial scans still must be done before the VM machine can take over.


You must be logged in to post a comment.